SSA2py Workflow
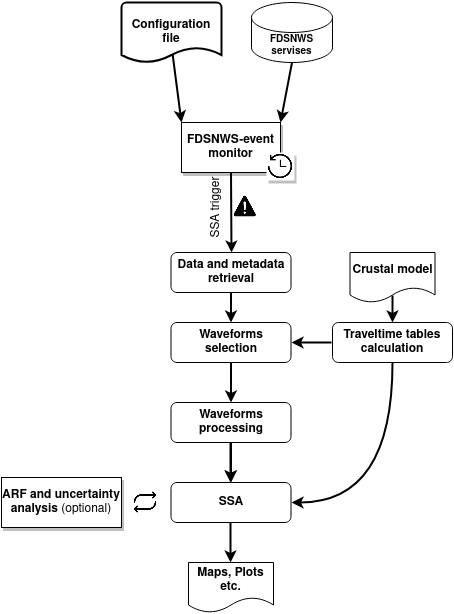
SSA2py was designed with the aim of maintaining a simple but at the same time efficient workflow. To automatically implement SSA2py, these sequential steps are typically taken:
1. Check for new events
Monitoring FDSNWS-event services trying to identify new seismic events. In case of a seismic event that complies to the user given criteria the SSA2py initiates. Inside the configuration file there is a special section dedicated to event restrictions in order to avoid false triggers or mislocated seismic events.
2. Select Inventory/Waveforms
In a case of seismic event, SSA2py tries to gather all the available data/metadata information from various user given sources. For station metadata SSA2py can gather info from FDSNWS-station services, local StationXML files or StationYAML files (yaml type files oriented mainly for manual SSA2py applications). For seismic waveforms SSA2py can look in Seedlink (near-real time application), FDSNWS-dataselect services, data in SDS and MSEED format.
Erroneous waveforms can be automatically discarded from the process by applying various quality check methods (SNR, CLIP, TIME).
3. Waveforms processing/Travel-Time tables
The user can easily adapt the SSA application based to his/her needs by using different waveforms processing approaches. A variety of options for filtering, rotation, normalization, change waveforms type etc is offered. Also the Travel-Time tables necessary for the SSA application are calculated. Except from the classical 1-D model implementation SSA2py offers also 3-D velocity model option.
4. SSA Calculations
In the next step SSA2py calculates SSA in time for an adjustable 4-D grid. Uncertainty analysis tests can be performed (Jackknife, Bootstrap, Array Response Function) if the user enables these options.
5. Results analysis
Results analysis plots.